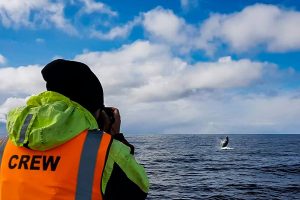
Whale watching is probably the ultimate wildlife experience, and certainly one of the most difficult challenges that I faced as a wildlife photographer.
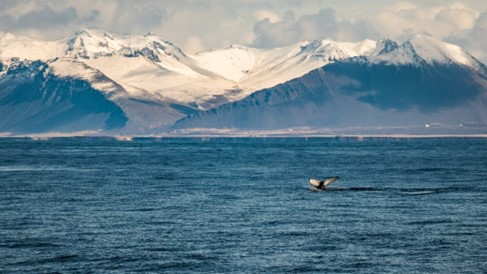
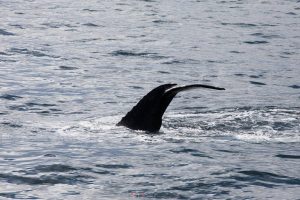
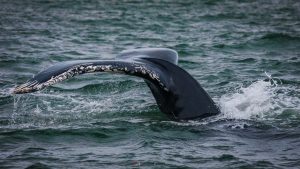
Whales spend most of their time underwater but of course, being mammals themselves they must surface to breath. This gives us a small window of time to enjoy them and possibly take some fascinating photos.
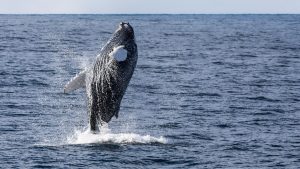
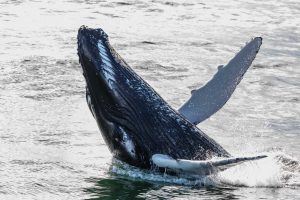
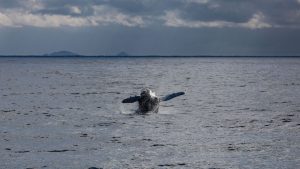
Sometimes cetacean can breach too! Even a huge humpback whale, a 40-ton animal, can launch itself high in the air becoming one of the most breath-taking natural shows I’ve ever seen in my entire life.
Nevertheless, this rare and spectacular event takes about 1 second, and doesn’t happen very often. Most of the time it happens in just a flash, a blink of an eye and if we are not 100% ready, we will not be able to enjoy it. So, you can imagine how hard it can be to take a good picture of it.
Here a few tips that may be of help for those of you who want to go back home with an epic homemade postcard from Iceland.

Pictures by: Federico Facchin
First of all, it is good to know that to photograph whales breaching you do not need fancy equipment. Of course professional equipment, if properly used, gives us better quality images, so let’s take a moment to speak about cameras, lenses etc.
Camera body:
Definitions, shutter speed, and ISO sensibility are among the most important parameters to judge a camera body.
Most of the entry level cameras can shoot at 1/400 sec. Professional cameras shoot at 1/8000 sec but for my best whale shots I’ve worked with 1/1000 sec roughly.
Usually we go whale watching during the day, so there is enough light to satisfy the ISO performances of all the cameras.
Lenses:
Obviously we are going to need a zoom lens (unless the whale gets THAT close), but:
If the lens is too bulky and heavy it is hard to operate it, especially considering that you are floating on a boat, with waves shaking it.
You do not want to have too much zoom power, so I have been working with 200mm zoom. Perhaps 300 mm works good as well, but if you exaggerate it results very hard to be able to point the whale quickly enough. We do not need extremely bright lenses with large aperture, for example; f2.8. A humpback whale can get up to 17 meters, so at a wide aperture part of the body would be blurred.
Make sure to switch on the stabiliser (selectors mode 1 for the advance lenses). If your lens doesn’t have the stabiliser option, you can solve that problem with a monopod or with a faster shutter speed.
Filters:
Something that I found extremely important are the filters. I am not talking about Neutral density filters (ND) but I am rather suggesting you to get a Polarized Filter (PL).
To use a PL filter is not just important, it is sometimes fundamental! The reflected light has the characteristic to be polarised, a PL filter can absorb and “delete” it. When sunlight is mirrored from the surface of the sea, it becomes extremely bright and it tricks the digital sensor of our camera. Consequently, we might have wrong expositions and can burn the colours.
PL filter (if correctly oriented according to the sun), can absorb most of these reflexes and greatly improve the final result of the picture!
Note that PL filters can make a difference even on cloudy days.
Pictures by: Federico Facchin
That being said, equipment is not important if you do not know how to use it.
Personally, I want to have full control over the camera, and I always work on manual mode. Shutter speed ranges between 1/800 sec and 1/1250 sec. and believe it or not it depends on the sea conditions. If the sea is extremely flat, it might allow us to increase the time exposition and vice versa.
Aperture is something that can change a lot according to the size of the subject, the number of subjects we want to include in the area of focus for our shot and of course how close the animals are.
Wide apertures will focus only a small portion of what is in front of us, but if the light conditions allow it, we might be able to close the diaphragm and include more subjects in the same shots. Usually I shot at f 5,7 but as I said, it depends on many factors.
ISO and temperature must be regulated according to the light conditions of course. Although, in this case I usually rely on the automatic exposition.
Another important thing: make sure you select the burst mode, or continuer shooting mode, and to make sure the auto focus will not miss the subject, select AI Servo in the auto focus options. This way the camera will keep adjusting the focus point.
Pictures by: Federico Facchin
Since the breaching of a whale is such a quick event, and since we have so many other things to think about, we may not have the chance to think about the composition of the shot. Therefore, try to use the central AF point not to miss it, and you can always adjust the picture in the post production.
If what I told in the previous paragraph sounds like a foreign language, select the “sport” mode. It is meant to take pictures of fast moving subject and it should give you good results as well.
Now, to make sure not to miss the breach of a whale the two golden rules are: never give up and never let your guard down.
You must be ready for a big endeavour, as both body and mind will be under pressure. Patience is the key, and even if nothing has happened after two hours on the sea, it does not mean it will not happen!
Standing in a boat can be tiring, especially on a rough sea, and you must keep the camera in position! Do not put the camera down, especially when the expert guide on board tells you that there are likely whales in the area. Keep the camera pointed at the sea, where the guide believes there are more chances to see the animals.
A whale breaching happens in a flash, which does not leave time for the photographer to point the camera, adjust the settings, focus and shoot. The Camera setting must already be perfect, and the camera should be lifted too, so that you only have to point it in the correct direction, focus the subject and shoot! Keep the camera in position and keep adjusting the parameters, especially if the boat drifts and the relative sun position changes.
However, being able to use the equipment can be pointless as well if you are not lucky to have a whale breach in front of you!
I have been very lucky, as I could see my first humpback whale breaching through the camera’s eye. What I suggest you is to be patience, and as soon it happens, you must try and keep it cool to focus on the subject and shoot. It might be worth the best picture of your life!
Also, be ready to fail my friends. At the end of the expedition you will probably have dozens of blurred pictures and many pictures of splashes. But if you are lucky (and talented), you might also have a correctly exposed and focused picture of a whale above the waves.

Pictures by: Federico Facchin
Experience, patience, tenacity, and a bit of good fortune will permit you to shoot pictures like these on your next whale watching adventure with Special Tours – Wildlife Adventures in Reykjavík, Iceland.
Good luck to all of you whale watchers!
Federico
—————————–
Blog by: Federico Facchin